Understanding Compression
- What is Image Compression?
- Why do we need to Compress Images?
- Lossy vs. Lossless Compression
- Vector vs. Raster Images
- Selecting the Correct File Format
- Time to Compress
- Tips and Tricks
What is Image Compression?
Each image requires a certain amount of memory to be stored. The amount of required allocated memory is based on the image's dimensions, how many pixels the image contains, and the amount of colours available per pixel (known as bit depth). Image compression is the process of reducing the amount of memory that an image takes up.
Why do we need to Compress Images?
The speed at which a website loads is based on two things: the speed of the internet connection and the amount of data stored within the website. While we can't control the former; we can control the latter. By reducing the size of images that will be placed on our website, we also reduce the total data that needs to be loaded each time a viewer visits it. Compressing images is essential for a fast website which will hold the user's attention.
Fact: 40% of internet user's will exit a website if it doesn't load within 3 seconds.
Lossy vs. Lossless Compression
Lossy compression means that some of the pixel data in the image will be removed. When dealing with lossy compression, make sure to save a copy of the original as you will not be able to revert back after compression. This type of compression typically has greater file size reduction.
Lossless compression means that the pixel data will only be compressed, but not removed.
So - which do I use?
This is when your own judgement comes into place. Use both if you are willing to sacrifice some quality for file size. Skip the lossy step if the file contains intricate details or needs to be shown as is. Keep in mind – just because lossy compression sacrifices pixel data doesn’t necessarily mean that the resulting image will be ugly. Visual results are often almost just as good and the file savings can be huge.
Vector vs. Raster Images
Vector graphics are resolution and scale independent, which makes them a perfect fit for the multi-device and high-resolution world. They use lines, points, and polygons to represent images. They are best used for images which consist of geometric shapes and deliver sharp results at every resolution/zoom. File sizes are usually smaller, especially when dealing with simple images that need to be displayed at any size.
Vector images should be stored in a Scalable Vector Graphics (SVG) format. SVG files can be created by vector drawing software (We recommend Adobe Illustrator) or by hand and directly in your favourite text editor. However, they will need to be saved as a web-friendly file format before being inserted into a webpage (See Selecting the Correct File Format)
Use vector graphics when displaying simple shapes such as logos, icons, and so on.
Raster graphics represent an image by encoding the individual values of each pixel within a rectangular grid. This means that the files sizes are typically larger than vector graphics, but they can handle more complex images. However, they are resolution and scale dependent meaning that quality will diminish as size increases (think of what happens when you try to stretch a photo). This means it may sometimes be necessary to save multiple copies of the image at different sizes.
Raster graphics can be created using Photoshop, MS Paint, Paintbrush etc. Also, any photo/screenshot will be a raster graphic by default.
Use raster graphics when displaying images that would be difficult to describe using lines, points, and polygons such as photos and screenshots.
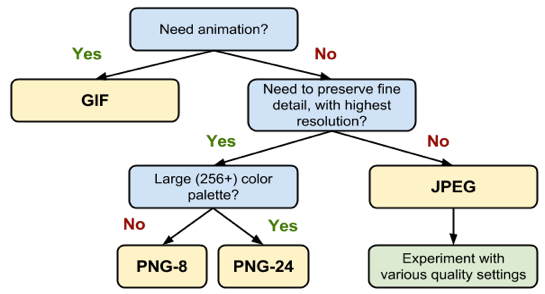
Selecting the Correct File Format
Once you’ve finished creating/editing your image, you will need to save it for the web. There are 3 universally supported image formats: GIF, PNG, and JPEG. PNG can be split into PNG-8 (256 possible colours) or PNG-24 (16,777,216 possible colours). To decide which format you should use, follow this simple flowchart:
Time to Compress
At this point, you’ve saved your image and made all the right decisions regarding which type of compression you’re looking for, graphics type, and file format. The next step is to compress the image. In Image Optimization, we’ve provided you with many tools to do this as well as instructions on how to decide which tool(s) to use.
Tips and Tricks
- Use vector images as much as possible. Vector images will allow you to resize with ease and save space.
- Make sure you pick the right image format for the job. Use GIF only for animation. Use JPEG’s for photos that don’t need to be the highest resolution, as well as screenshots. Use PNG’s when resolution is a priority and use specifically PNG-24 when a wide colour palette is necessary.
- Remove unnecessary image metadata. Many raster images contain metadata that isn’t need. Remove metadata about geographic information, camera information etc. to reduce the size of the image.
- Keep files to a maximum of 1 MB. This is more than enough data to have a high quality image while still allowing your page to load quickly
